
Hot water recirculation systems - BUILD - hot water recirculating pump
Once you have the desired pressure, tighten the lock nut back into its original position by doing the reverse of what you did before. This will ensure it stays set!
With that in mind, keep reading to learn more about them and the steps involved in adjusting a pressure-reducing valve. Let’s get into it!
Next, you need to find the water pressure regulator. This is a bell-shaped device that’s close to the main water supply and sits on top of the pipe.
Now, let’s look at how you can adjust a water pressure regulator yourself—having one won’t do much good if it isn’t set properly!
However, if the water pressure in your home becomes too high or too low, you may need to adjust them manually. It’s also a smart idea to do this before the end of winter in preparation for the heavy rain that comes with the spring season.
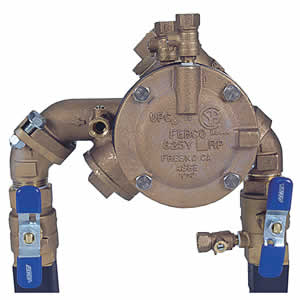
SKU 825HBV70This assembly is obsolete, having been replaced by the lead free version 2" LF825YASeries 825Y "Y" Pattern Design Reduced Pressure Zone Assemblies are used to protect against high hazard (toxic) fluids in water services to industrial plants, hospitals, morgues, mortuaries, and chemical plants. They are also used in irrigation systems, boiler feed, water lines and other installations requiring maximum protection. They feature a bronze body and threaded ball valve shutoffs. Maximum Working Pressure: 175psi (12.1 bar).
A water pressure regulator is a specialized type of valve designed to ensure the flow coming in from your municipal water supply is manageable for your pipes.
While adjusting a pressure-reducing valve can be easy, there are always risks associated with DIY handiwork—especially when it comes to plumbing. So, to avoid costly mishaps, consider calling a professional plumber from PlumbWize.
Now, position the wrench over the top nut of the adjustment screw and turn it accordingly. Counterclockwise turns will decrease the pressure, while clockwise turns will increase the pressure. The water pressure gauge will indicate changes in PSI.
The good news is adjusting your pressure-reducing valve is straightforward, with it typically being a DIY job that takes less than an hour.
With over 60 years of plumbing experience, you can rest assured that we know a thing or two about adjusting a pressure-reducing valve. We’ll work quickly and efficiently to ensure yours is set at your desired water pressure, keeping your pipes safe all year round.
The top part of the regulator should have the adjustment screw and the lock nut. The former raises and lowers the water pressure, but before you can adjust it, the lock nut must be loosened first. Turn the wrench in a counter-clockwise direction to loosen the nut. Be careful not to turn it too far, however.
Water pressure regulators—a.k.a. pressure reducing valves—play a quintessential role in residential plumbing systems. As the name implies, they control the force with which the water flows through your pipe—thus making for a strong or weak flow.
As such, most water pressure regulators have a screw on top that can be adjusted to increase tension in the innerspring or loosened to allow water to flow freely. We’ll talk more about this when we get into the steps for adjusting the pressure!
Step one is assessing your home’s current water pressure, as you should have an idea of where it stands before making adjustments. The easiest way to do this is by attaching a pressure gauge to any hose spigot and then observing the reading.


 8615510865705
 8615510865705